Showing posts with label marabu art sprays. Show all posts

Thursday, 3 January 2019

Song bird - A mixed media art journal spread

Hi everyone,
Sharing with you a mixed media art journal spread that I made for Art and Soul studio's January mood board. Here is the link to Art and soul studio Australia's blog


This month's mood board is so beautiful and magical. I hope you will take part in this month's challenge.


Join Art and Soul studio's Soul sisters Facebook group for monthly challenges and chance to win cool prizes. Here is the link to Soul sisters Facebook group

Lets start our art journal spread:

Its my small Dylusions journal. I glued few pieces of washi tape with matte medium. Next I applied modeling paste through a Stencil. I let it dry completely before proceeding to the coloring part.


I colored the pages with Lindy Stamp Gang's Starburst sprays in Tibetan poppy teal, Mad Hatter mint and Drop dead Gorgeous green. I also added a bit of Cocoa Marabu art spray at the edges.
Next I did a bit of background stamping with Archival inks in Paradise teal, Potting soil and Jet black ink.
Assembled and glued my embellishments with gel medium and hot glue.
Added few rub ons and a title.


That's it for today.
I hope you liked my journal spread.

Thank you for visiting
Take care and hope to see you soon.


Saadia Nawaz


Products used:

Metal charms from Art and Soul studio store - soldout
Prima Marketing art basics Modeling paste
Marabu Art Spray Cocoa
2 crafty chipboard frame from Art and Soul studio store - soldout
Chipboard flower from Art and Soul studio store - soldout
Tim Holtz Ideaology travel Ephemera from Art and Soul studio store - soldout.

Thursday, 28 December 2017

Anne Cahill - Guest Post

Hello All,
 
Today we are sharing with you our second guest designer for the month Anne Cahill.
Each month in our facebook group Soul Sisters there is a challenge that you can participate in. Anne was our October winner and using her haul from the store created an art journal page.

Let's find out a little bit more about Anne before we share the products she received what she created.
 
 
Through the day I am the Operations Co-Ordinator for our Electrical and Data Contracting business. Not the industry I ever imagined myself in but have found the past 20 years very rewarding. 
I have always been interested in arts and crafts for as long as I can remember, something my parents had always encouraged. I became more interested in drawing and painting around 2000 and have continued down the mixed media path letting the other crafts take a back seat. Acrylic paint and pencils would be my favourite but I am happy to use whatever is available.
I try to find time each week to sit and create, it lets me process the week’s events, clears my mind and lets me connect with other like-minded people.
Creating is so rewarding, it need not be expensive to get started just purchasing one colour here and there as you need it. I used my October winnings of the Soul Sister Challenge to purchase some Marabu Acrylic Art Sprays which I have used in a quick demo below.
When using my Dylusions or any non-permanent inks I would often get frustrated as I enjoy building layers, adding shadows etc. and if I decided it needed some additional touches it would move, blend or simply bleed through the top layers of paint altering the colour, never allowing for any bright pure highlights. As you will see, I use the spray in different ways not only as a spray. I like to add the contents of the spray bottles to tint acrylic paints, brush it on or rub it on. It goes a long way.
I was excited to try the acrylic inks and will be sure to use them in my future work.
I share my work from time to time and if you would like to see please visit or friend me at
 
Here is a photo of the products that Anne used
 
And here is the art journal page that Anne created
 
Thank you for joining us today and please visit Anne and show her some arty love.

Monday, 21 August 2017

Hello Soul Sister

Todays project is part of the soulful project which I'm really excited about! I love inspiring quotes. 

Firstly I used Ink sprays such as Dylusions and Marabu.


I then added some red acrylic as I wanted to add a deeper colour, I sprayed some water to spread it a bit easier over the paper.

 I  Then used some tissue to take away some of the paint to give it a grungy look.


I then added some Artisan Powder (Marquise Blue) which gave it a bright powdery blue. I wanted to spread it around so I went over the blue with a small amount of gesso.


I wanted to darken the corner further so I added some small amounts of dark blue acrylic paint.


Once it was dry I used a white gel pen to create a whimsical lady/angel/fairy or if you wanted you can create any image you want. 


To add texture I used the Jane Davenport acrylic paint and the JD stencil provided with the paint.


And finally I used different Tombow dual pens to add the quote. Creating text is not my strong point which is why I used pre-made text but I like the faded look of the Tombows have produced.


I hope you enjoyed the lesson and found some inspiration, it would be great to see some creations in the soul sister FB page.

Tuesday, 8 August 2017

Looking on the bright side

Good Morning Soul Sisters
 
Today I am sharing with you are art journal page that I created as inspiration for the Soulful Project in our facebook group.
 
Here is the quote that we had to use

And here is my art journal page.
 
products used from the shop
 
Happy Creating


Tuesday, 11 July 2017

Technique Tuesday - Marabu Art Spray

Hello Soul Sisters
 
Today is Technique Tuesday and I am using the Marabu Art Sprays.
They are available in the store.
The colours that I am using are - Bordeaux, Aubergine and Aquamarine.
 
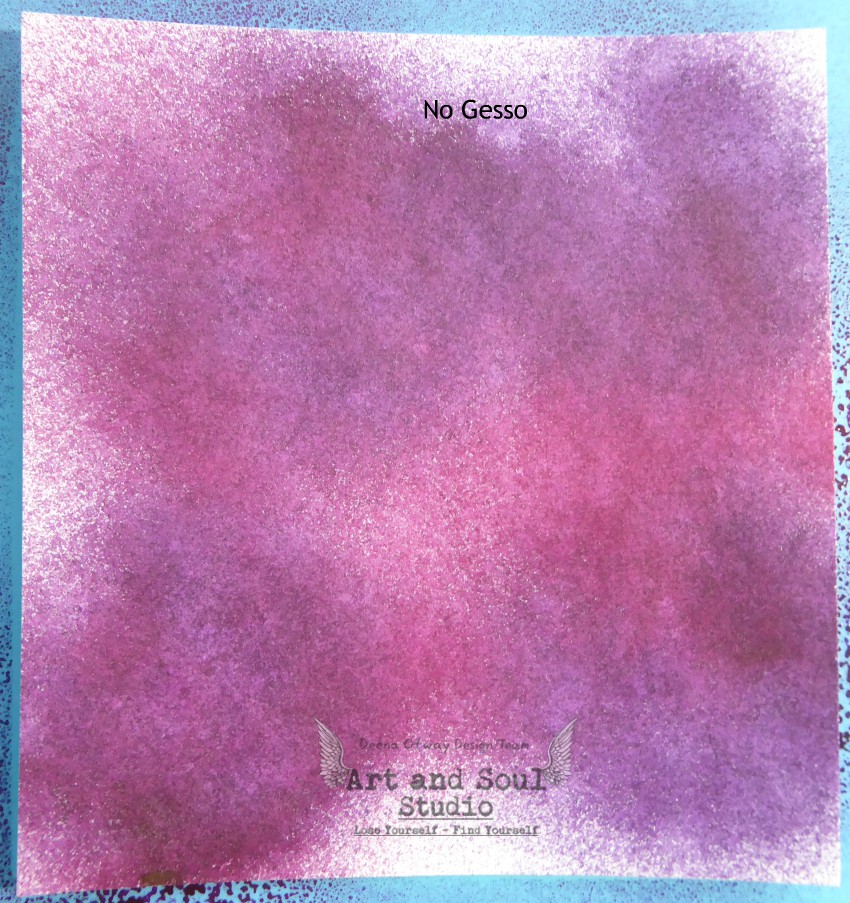
What are you these products you ask? Well, they are something that I find really exciting. They are acrylic sprays, which means they are permanent , quick drying and waterproof. Most other sprays that you find on the market are not waterproof, they reactivate when water added even after they are dry.
 
Would you like to see what fun I had?
 
I started with four pieces of heavy watercolour cardstock I think they are 300 gsm or maybe even heavier, I cant exactly remember.
2 pieces I left naked and the other 2 I covered with a layer of gesso. Through this tutorial I have made sure that each photo has gesso or no gesso written on it, so its easy for you to see the difference.
 
I sprayed my watercolour paper with the aquamarine spray and then dried it with my heat gun. For a test I then sprayed it with some water to see if I could remove any of the colour. Once I sprayed the water I did actually walk away as one of my children called me. When I came back I wiped the spray with a piece of paper towel as shown in the picture. I did remove some of the colour but it was fairly minimal.
 
The next two photos are of my watercolour paper with the layer of gesso. I did the same as above although I did do the wipe test twice. The top picture was where I sprayed and wiped almost straight away after I dried it with my heat gun, as you can see hardly any colour came away.
 
The second photo is where I decided that I wanted to see what would happen if I sprayed the water and then walked away for a few minutes. Again yes colour came away but nothing to major.

 
Using the aubergine and Bordeaux sprays I sprayed them while they were still wet to see what colour mixing I would get. You can see both colours in both of the following photos. I have to say that I am preferring the effect that the spray has on the gesso, and the colours are much brighter. The gesso is stopping the colour from soaking into the paper so of course it will be brighter.
 
 
These next two photos are where I have taken the aquamarine sprayed card and then sprayed them with bordeaux. What I like about this is that although I have sprayed a darker colour over the top the aquamarine still some through.

 
I decided that spraying the dark colour on top wasn't enough I wanted to see what happened when I sprayed the aquamarine over the top of bordeaux, I am loving what these sprays are doing and the vibrancy and richness of the colours of the gesso is making me want them.

 
My last bit of play is where I add the aquamarine spray to some texture paste and use it through a stencil. I spray the spray three times, and it didn't really alter the consistency of the texture paste.


I hope I have given you lots of information on how these sprays react with each other and other elements. I know it wont be long before I have some more in my stash.

Happy Creating


Sunday, 2 July 2017

'Star' by Elisa Ablett

Hi Soul Sisters,

Elisa here from the design team with my latest tutorial - a mixed media scrapbooking page.

Art and Soul Studio is now branching out to stock scrapbooking and papercraft products and what better way to showcase the new ranges in store for those who enjoy scrapbooking and especially mixed media scrapbooking then a mixed media tutorial. This tutorial is not only for those who scrapbook, you can use the techniques shown for Art Journalling or Artist's Trading Cards or even on canvases. You are only limited by your imagination!

Here is my layout


Here is the collection I used from Art and Soul Studio - 7 Dots Studio - Hazy Days Collection and I also used stamps from Carabelle Studios


Tutorial Time!


Step 1 - Using the 'Gelly' Hazy Days paper, grab your Marabu Art Sprays and carefully aiming at the centre of the paper, spray your turquoise colour in an oval shape. Then spray your black colour in the centre of the paper while wet, this will let the black merge with the turquoise to create a merging pattern. 


Step 2 - Using an alpha stencil and the lovely bright yellow Marabu Art Spray, hold the stencil slightly above the paper and spray around the oval colour area on your paper through the stencil.


Step 3 - Add some black splatters to your background using your black spray. I take the spray lid off and tapping my finger on the tube over the page.


Step 4 - Make sure your page is completely dry then its time for stamping. Using an Archival safe black stamp pad for example a Versafine or Staz On and your stamp on an acrylic block, ink your stamp. Then stamp in the centre of your page as pictured.


Step 5 - Add some different stamping to the centre of your page and also to the left and right side of your page.


Step 6 - Add some splatters of the Turquoise and Black ink to your page by taking the lids off and tapping the ink onto the page.


Step 7 - Using the Alpha Drips Stencil and TCW Black Modeling Paste and palette knife, add some texture to your page to continue with the grungy look 


Step 8 - Add some of the coordinating stickers to your page and paint the coordinating chipboard with black gesso or paint and let dry. 

Also using a Kaisercraft Decorative Die - Texture Woven as pictured below - die cut two of the texture pieces out of black cardstock and put them aside.


Step 9 - Stick your elements down onto your page including the chipboard and die cut pieces. I use Helmars Acid Free Glue


Step 10 - Glue black cotton thread over the top of your texture pieces in a messy heap!


Last steps - A great technique and cheater's way of adding foiling to your page or chipboard is to use a glue stick and a paintbrush! Wait until your chipboard is dry and then using the glue stick, add glue to the top of the chosen chipboard pieces - I used the stars and the title piece.

Then using tweezers or just your fingers add some gold foil flakes over the top of the glue areas on your chipboard. Let dry completely.


Finish off by using a stiff paintbrush - brush over the top of the chipboard quite roughly to brush away the foil that is not glued down, this will result in a distressed foil effect.


Mat your photo with a 5mm edge in a piece of white cardstock then re-mat the photo in a piece of 7 Dots Collection - Hazy Days - Slick paper.

7 Dots Studio - Hazy Days - Slick

Arrange your remaining elements on the paper and glue down.

Here are some close ups of the finer details - 


Products


Well that's it from me today! Hope you have enjoyed the tutorial, make sure you leave me some love.

Elisa xx


Blue Fairy on a Pink Donut Fantasy Acrylic Painting Tutorial

  Blue Fairy on a Pink Donut Fantasy Acrylic Painting Tutorial Glamour Shots Hey there everyone, Kristina ...